Top-Down Mixing with Compression
Top-down compression, as well as top-down mixing in general, is a very common mixing technique that is perfect for instantly adding vibe and movement to a track before any other processing has been done. It’s also great for making sure that you’re setting your mix up for success!
While that sounds great, what exactly is top-down mixing and what makes it such a popular technique? In this post, we will answer these questions and much more!
What is Top-Down Mixing and Top-Down Compression?
Top-down mixing is the process of applying processing to busses, or groups of tracks, before applying processing to individual tracks one at a time. It will often start at the master buss before moving down to individual instrument busses and the individual tracks.
Think about it like shaping the overall vibe of a group of tracks before controlling how each of those individual tracks sound.
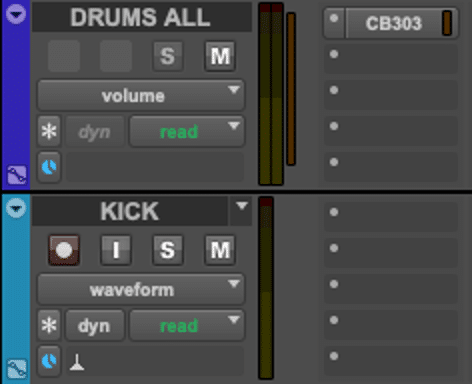
Applying Compression to a Drum Buss before Individual Drum Kit Pieces
As its name implies, top-down compression is the same idea as top-down mixing, except it pertains specifically to compression! Top-down compression involves adding compressors to your master buss and instrument busses before compressing individual tracks.
What is the Point of Top-Down Compression?
Mixing is the process of making different elements of a production work well and sound good together. In order to accomplish this goal, it makes sense to manipulate the overall vibe of a track before paying attention to its smaller details. Top-down compression gets groups of tracks and the overall mix closer to the end mixing goal. This makes fine adjustments on individual tracks easier, as the entire mix will be sounding better already.
At the end of the day, you could’ve recorded every track with the most expensive, well-regarded gear on the market, but if you can’t make it all work together then it doesn’t matter!
How to Use Top-Down Compression
Now that we’ve established what top-down compression is and why you should try it out, let’s talk about how to dial it in! It all starts with balance.
To begin the top-down mixing process, you’ll need to have a decent understanding of what all your mix’s elements sound like when they’re played together even before any processing has been applied. Otherwise, for example, you could end up compressing your master buss while your snare drum is 15 dB louder than your vocals, which obviously wouldn’t provide you with any helpful results.

A Mixing Session with Rough Volume Balances and Panning Set
To get your mix on the right track before applying any processing to any tracks, use only volume faders and pan knobs to dial in a rough balance for each of your mix’s elements. This way, you will be able to make much better decisions when you start applying compression to your busses.
From there, beginning with the master buss before moving down to instrument busses, start dialing in compressors to glue everything together. You can also add some top-down EQ into the mix (no pun intended) if you’d like! Once you’re happy with how everything sounds overall, move on to individual tracks to make more detailed changes.
When You Shouldn’t Use Top-Down Compression
Like we mentioned in the previous section, top-down mixing of any kind usually doesn’t work if you don’t first get a rough idea of what all of your tracks sound like when they’re balanced together. Similarly, if you have any obvious issues with the dynamics of any of your tracks, you should resolve those before starting the top-down compression process.
Creating Dynamic Consistency Before Top-Down Compression
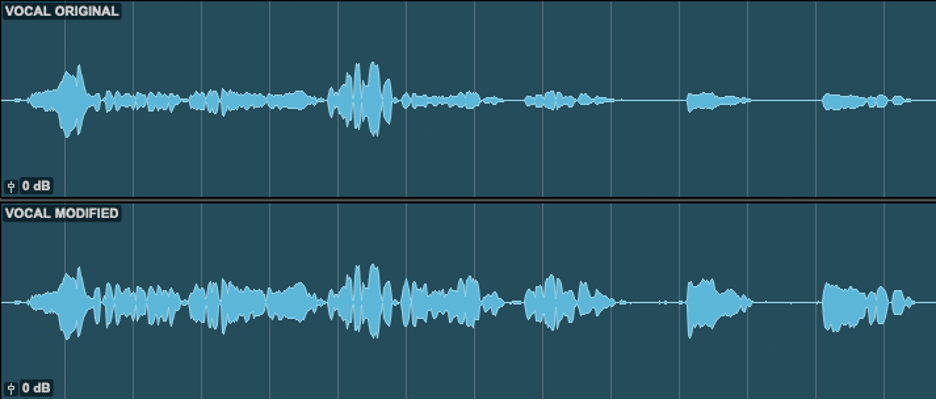
For example, let’s say your session has a vocal part that is incredibly dynamic during choruses. Specifically, the vocalist alternates between belted high notes and quieter low notes every other line. In a case like this, consider using clip gain to make the dynamics from line to line as consistent as possible. If you don’t, you might have a much more difficult time dialing in your master buss compressor.
To see this example in action, check out the screenshot above! The top waveform is the original vocal track, while the bottom waveform is that same vocal track after using clip gain to make the performance more dynamically consistent. By doing this, we’ll have a much easier time getting our vocals where we want them when dialing in our rough balance, and our master buss compressor will thank us.
Even if you end up deciding against top-down compression, this is a great workflow to use because it will make your life much easier when you compress your vocals later.
When You Shouldn’t Use Top-Down Compression
If you feel like you’ve got a good understanding of top-down compression and how it works, we recommend checking out the McDSP 6030 Ultimate Compressor to take it one step even further!
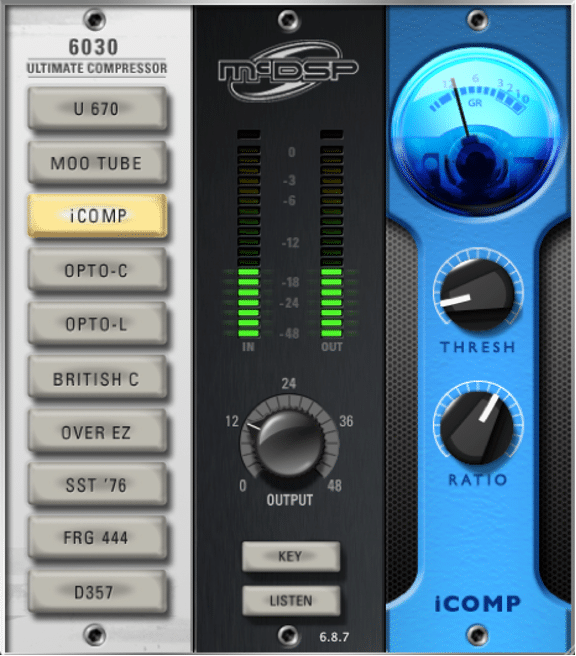
The McDSP 6030 Ultimate Compressor Plug-In
The 6030 features 10 unique compressor modules that’ll get you set up with everything from smooth tube emulations to aggressive solid-state designs. Additionally, some of these compressors are completely unique McDSP designs, and even the ones that emulate existing hardware feature unique variations created by McDSP.
Not only does the 6030 sound great, but it’s also incredibly easy to work with! Compressor modules are listed from least intense (top of the module list) to most intense (bottom of the module list). Also, swapping from one compressor module to another will transfer your settings to whatever module you switch to. That makes it incredibly easy to A/B the vibe of different compressors without needing to repeatedly dial in parameters!
Want to check out the 6030 for yourself? Try out a free 14-day, fully functional 6030 Ultimate Compressor trial here. As always, we hope you learned something new! Be sure to sign up for our newsletter below to stay up to date on all things McDSP. We’ll see you next time!